Showing posts with label python. Show all posts

Sunday, November 20, 2022

Download files from google drive with python - no API key

There are several scripts to download files from google drive using a shareable link. Some require
authentication others don't work. Here we're interested in those that do not require authentication.

The gdrivedl.py script provided by ndrplz just works fine.

> gdrivedl.py file_id

Another notable, currently non-working, alternative is googledrivedownloader. It probably worked at some point in time but today it fails. There's however a simple fix proposed in this thread. The code is here: 

import requests
 
def download_file_from_google_drive(id, destination):
    URL = "https://docs.google.com/uc?export=download"
 
    session = requests.Session()
 
    response = session.get(URL, params={"id": id, "confirm": 1}, stream=True)
    token = get_confirm_token(response)
 
    if token:
        params = {"id": id, "confirm": token}
        response = session.get(URL, params=params, stream=True)
 
    save_response_content(response, destination)
 
def get_confirm_token(response):
    for key, value in response.cookies.items():
        if key.startswith("download_warning"):
            return value
    return None
 
def save_response_content(response, destination):
    CHUNK_SIZE = 32768
 
    with open(destination, "wb") as f:
        for chunk in response.iter_content(CHUNK_SIZE):
            if chunk:  # filter out keep-alive new chunks
                f.write(chunk)
 
if __name__ == "__main__":
    file_id = "TAKE ID FROM SHAREABLE LINK"
    destination = "DESTINATION FILE ON YOUR DISK"
    download_file_from_google_drive(file_id, destination)

Sunday, November 13, 2022

Fix your matplotlib colorbars!

Matplotlib colorbars are a mess, especially if using subplots I often get tall bars like in this case


but instead I wanted


This great article by Joseph Long describes this issue in detail and provides some solutions. 
The code for generating the first figure is

import matplotlib.pyplot as plt
from skimage import img_as_float, data, color, transform
from scipy import ndimage, signal, fft, io
import numpy as np
 
img = color.rgb2gray(img_as_float(data.astronaut()))
I1 = np.abs(fft.fft2(img, norm='ortho')**2)
 
#plt.figure(figsize=(7.5,2.5))
 
subplotnum=1
 
plt.subplot(1,2,subplotnum); subplotnum+=1
plt.imshow(img)
plt.colorbar()
plt.title('image')
 
plt.subplot(1,2,subplotnum); subplotnum+=1
plt.imshow(np.log(fft.fftshift(I1)+1e-6))
plt.colorbar()
plt.yticks([])           # desable yticks in the second image
plt.title('log spectrum')
 
plt.tight_layout(pad=0.4, w_pad=0.5, h_pad=1.0)
plt.show()   

A solution provided in the article consists in using a custom colorbar, the important changes are highlighted

import matplotlib.pyplot as plt
from skimage import img_as_float, data, color, transform
from scipy import ndimage, signal, fft, io
import numpy as np
 
def colorbar(mappable):
    from mpl_toolkits.axes_grid1 import make_axes_locatable
    import matplotlib.pyplot as plt
    last_axes = plt.gca()
    ax = mappable.axes
    fig = ax.figure
    divider = make_axes_locatable(ax)
    cax = divider.append_axes("right", size="5%", pad=0.05)
    cbar = fig.colorbar(mappable, cax=cax)
    plt.sca(last_axes)
    return cbar
 
img = color.rgb2gray(img_as_float(data.astronaut()))
I1 = np.abs(fft.fft2(img, norm='ortho')**2)
  
subplotnum=1
 
aa = plt.subplot(1,2,subplotnum); subplotnum+=1
ax = plt.imshow(img)
colorbar(ax)
aa.set_title('image', size=14)
 
aa = plt.subplot(1,2,subplotnum); subplotnum+=1
ax = plt.imshow(np.log(fft.fftshift(I1)+1e-6))
colorbar(ax)
aa.get_yaxis().set_ticks([])  # desable yticks in the second image
aa.set_title('log spectrum', size=14)
 
plt.tight_layout(pad=0.4, w_pad=0.5, h_pad=1.0)
plt.show()    

Sunday, March 3, 2019

Run a dockerized jupyter notebook (with GPU)

Launch the docker container (running a jupyter notebook with unprivileged an user).
This command maps the port 8888 of the container to the port 9999 of the host, mounts the directory /home/foo/docker to /home/foo in the container     
$ docker run --rm -p 9999:8888           \
         -v /home/foo/docker:/home/foo   \
         -it jupyter/tensorflow-notebook \
         jupyter notebook --port=8888
Using the nvidia-docker driver it is possible to assign a GPU to the container:
NV_GPU=1 nvidia-docker run --rm -p 9999:8888 \
         -v /home/foo/docker:/home/foo         \
         -it jupyter/tensorflow-notebook       \
         jupyter notebook --port=8888

To connect as root to a live container for maintenance use the command below. Suppose that the running container ID (from docker ps) is 4f177e045de6,  then call
docker exec -ti 4f177e045de6 --user=root bash

Saturday, February 23, 2019

Latex code and other tools for making neural networks diagrams


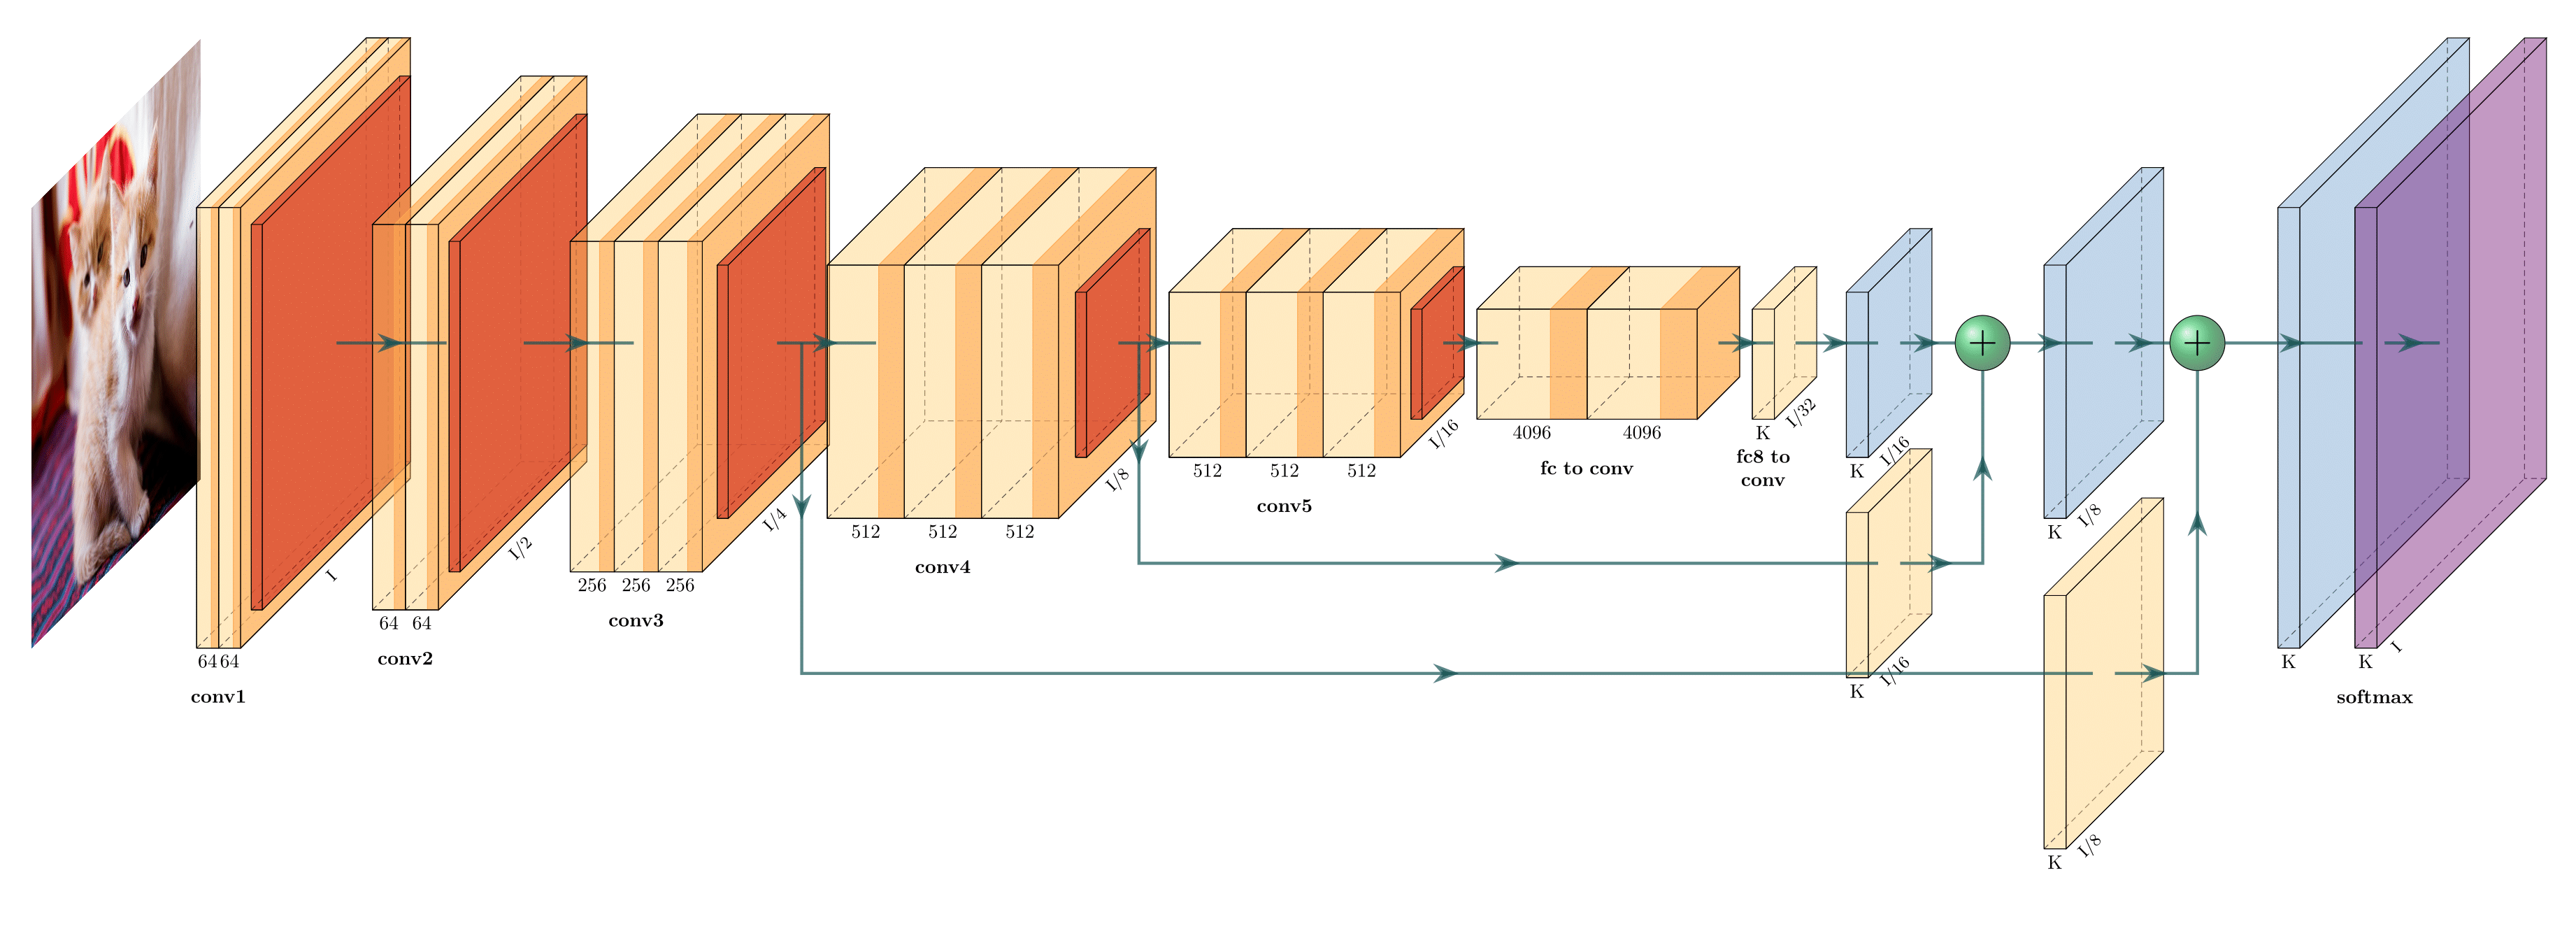
 PlotNeuralNet generates tikz code (for Latex) for illustrating a network architectures


NN-SVG is an online tool for illustrating simple architectures and that generates SVG code

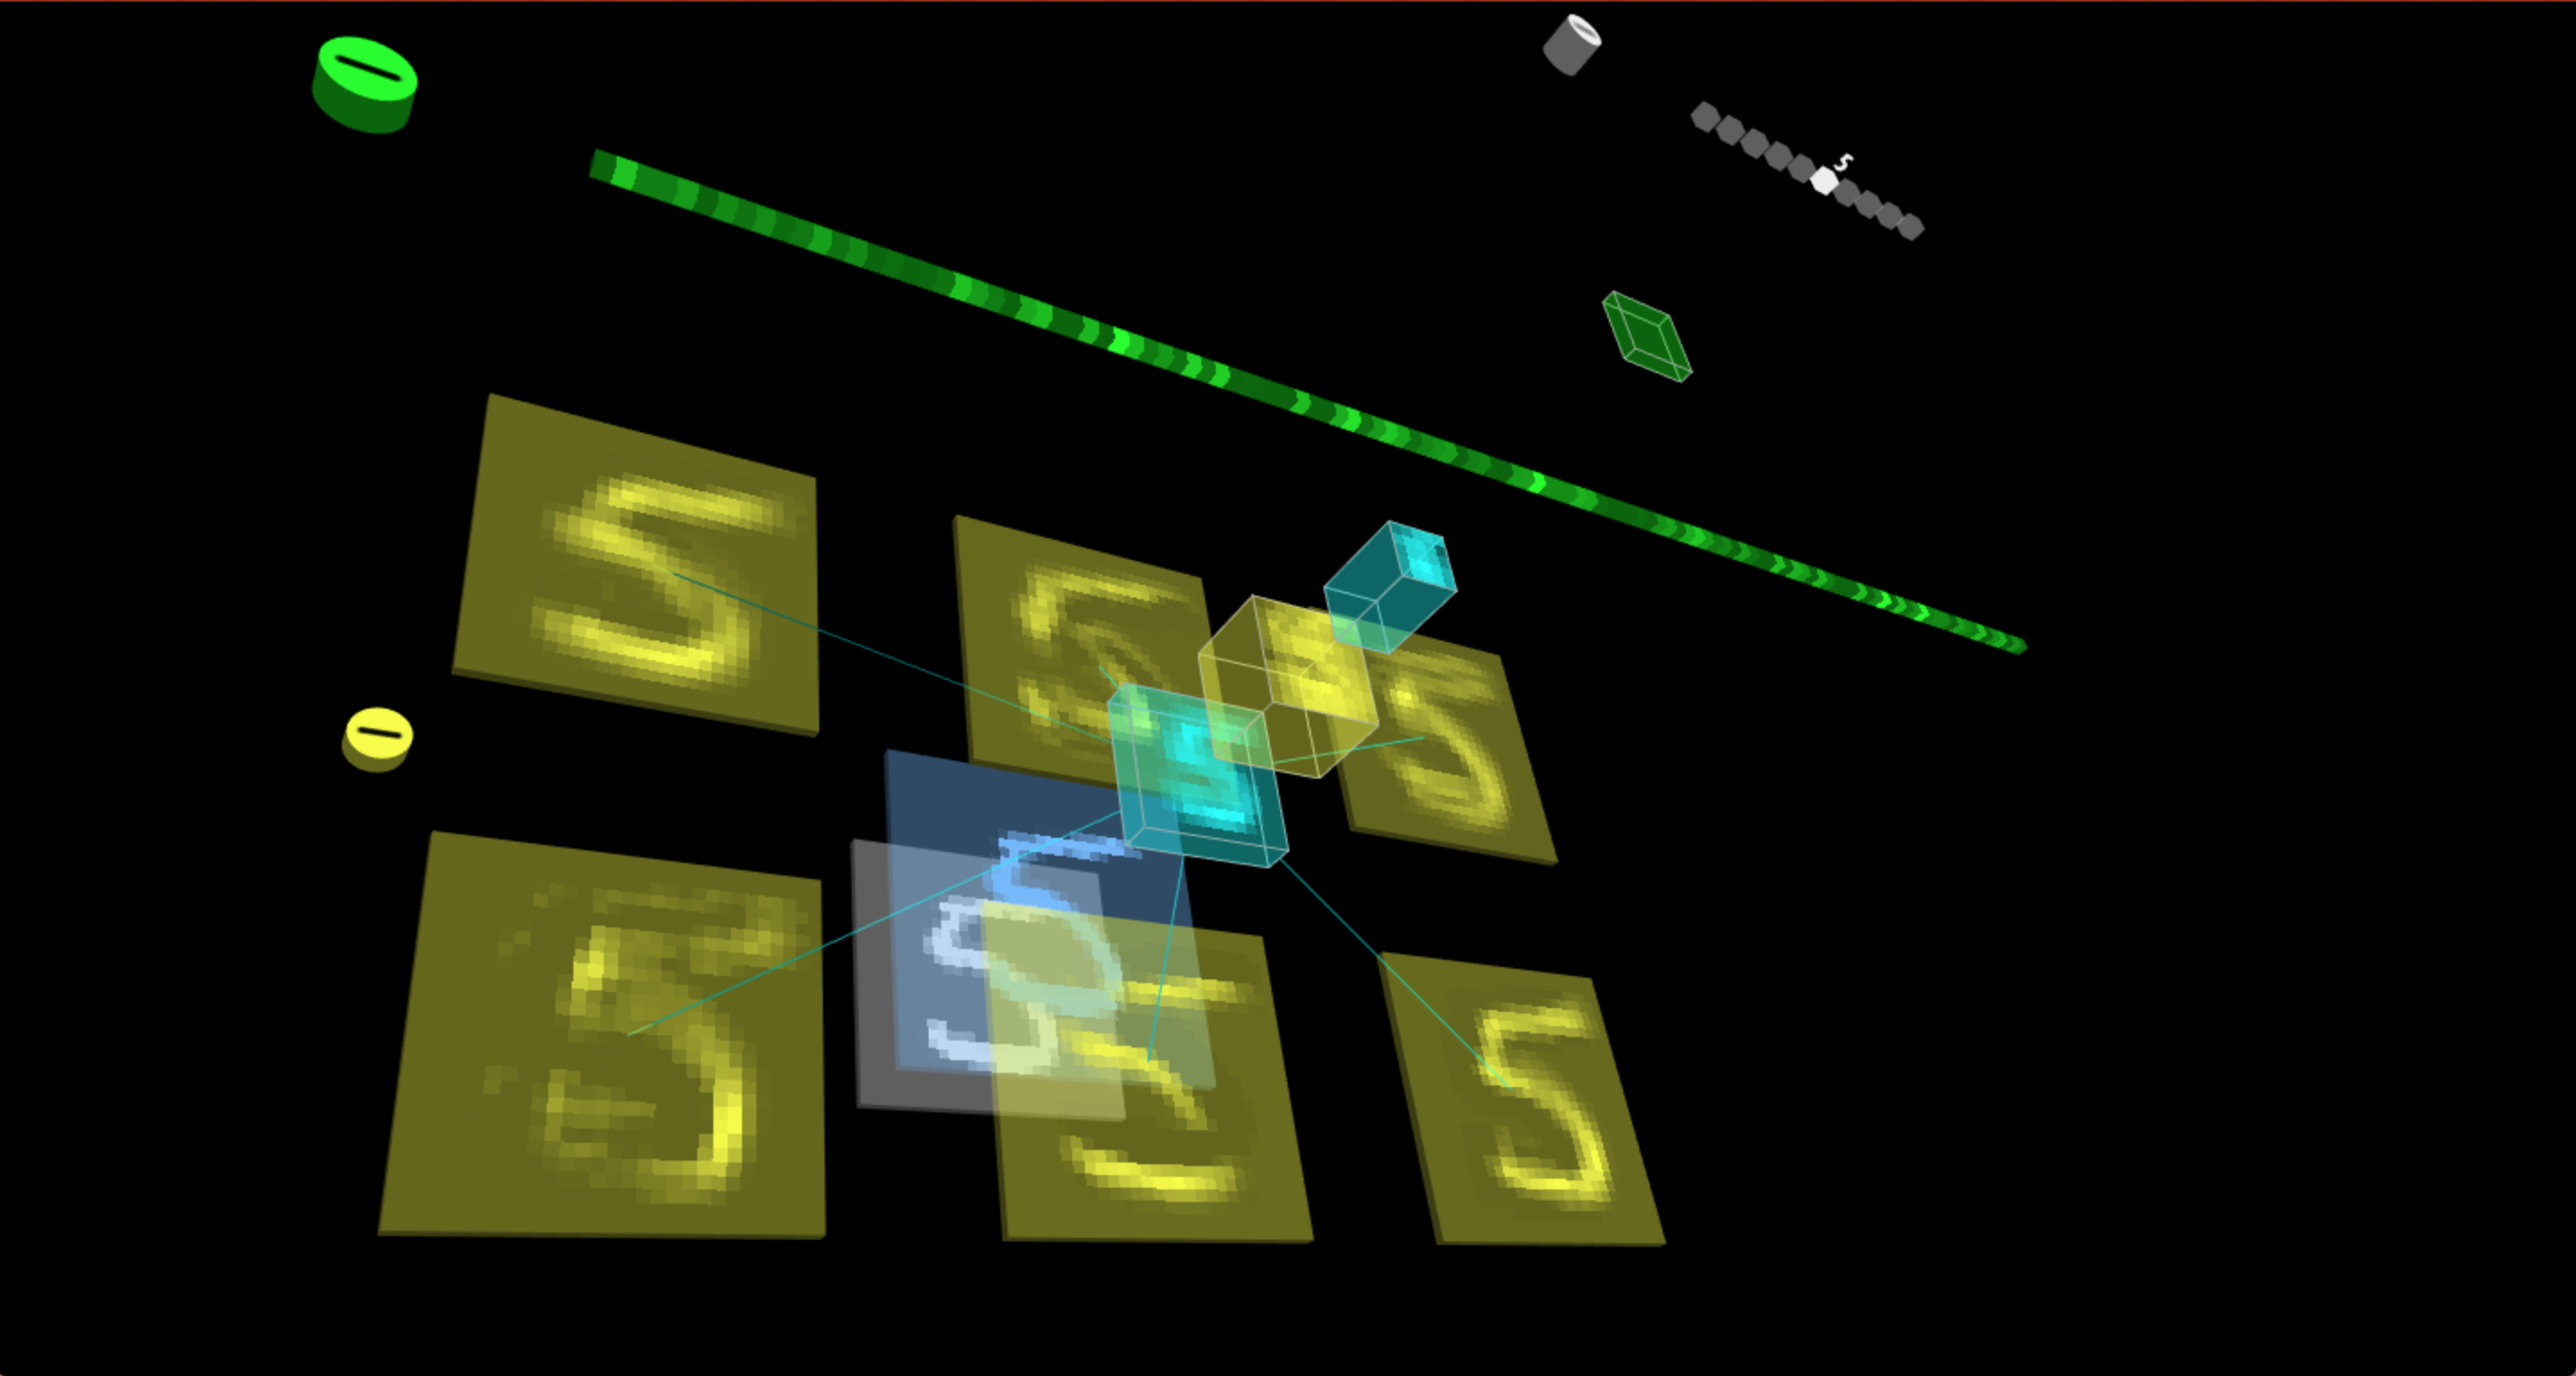
Tensorspace.js is a web-based tool that takes keras network definitions and produces beautiful 3D representations on the browser that are also functional!

Netscope is a web-based tool for visualizing neural network architectures for the moment only supports Caffe's prototxt format


Have a look at the stackexchange thread about this topic: https://datascience.stackexchange.com/questions/12851/how-do-you-visualize-neural-network-architectures

Sources:
https://github.com/HarisIqbal88/PlotNeuralNet
http://alexlenail.me/NN-SVG/LeNet.html
https://tensorspace.org/html/docs/startHello.html
http://ethereon.github.io/netscope/quickstart.html
https://www.draw.io/ (for manual drawing from elementary shapes)

Sunday, October 14, 2012

Download/backup BibTeX library from CiteULike, including all the attached PDF

CiteULike is a convenient solution for bibliographic management, but sometimes an off-line replica of the bibliography is also needed. This can be achieved by exporting the CiteULike library in BibTeX format, furthermore BibDesk (and probably other managers too) can be synchronized directly with the CiteULike server.

While it is easy to export a .bib file from CiteULike, downloading all the attached files and having the .bib linking to the downloaded files is a different story.

BibTeX and JSON exports of the CiteULike library can be retrieved from:
  http://www.citeulike.org/json/user/USERNAME
  http://citeulike.org/bibtex/user/USERNAME
The BibTeX export can be read directly into a bibliographic manager, but the JSON export contains more information than the .bib, in particular it contains the location of the attached PDFs. So the idea of the Python script linked below is to do the following
  1. download the CiteULike library in BibTeX and JSON formats
  2. parse the JSON export and download all the attachments
  3. modify the .bib file to include links to the downloaded copies of the attachments
the links in the .bib file should work for BibDesk and JabRef.

Before running the script:
  • setup CITEULIKE_USERNAME and CITEULIKE_PASSWORD variables in the script
  • verify you have wget and pybtex installed
Download the Python script:  citeulike_backup.zip

http://wiki.citeulike.org/index.php/Importing_and_Exporting#JSON


Gory details from http://wiki.citeulike.org/index.php/Importing_and_Exporting#JSON:
# save session cookies
> wget -O /dev/null --keep-session-cookies  --save-cookies cookies.txt --post-data="username=xxxx&password=yyyy&perm=1" http://www.citeulike.org/login.do
# download bibtex with private comments and download an attachment
> wget -O export.bib --load-cookies cookies.txt http://www.citeulike.org/bibtex/user/xxxx
> wget --load-cookies cookies.txt http://www.citeulike.org//pdf/user/xxxx/article/123456/891011/some_99_paper_123456.pdf

Thursday, August 16, 2012

Homebrew package manager for OSX + Tips

Forget Fink and MacPorts, Homebrew is the miracle package manager you are looking for.

Homebrew installs packages to their own directory and then symlinks their files into /usr/local.
Then there is no need to tweak the system's and compiler's search paths to reach the packages. Also the installation is extremely simple, and the syntax familiar:
  brew [search, install, remove] packagename

The big critic I read about was the lack of packages. Never noticed, probably because the number of packages have exploded during the last year. The packages are built locally, so compiling large applications may take considerable time.

Tips:
  • Compile for multiple architectures. If, for some reason, you need to compile a program/library with multiple architecture support, like on a 64bits system but with 32bits legacy applications. Then, while installing use the --universal flag:
         brew install --universal -v libtiff
    it will compile a "fat" library with multiple architectures (env UNIVERSAL_ARCH="i386 x86_64" to specify which architectures).
  • Python. This setting is very important, but may depend on the version of OSX.
    When I installed Homebrew it did not compile its own python, instead it used the python that came with the system. Then all python packages installed with Homebrew are stored in: /usr/local/lib/python2.6/site-packages,  which is not in the search path for  python. It must be specified with the environment variable PYTHONPATH, by adding this line to ~/.bash_profile :
      # CONTRIBUTED PYTHON LIBRARIES
     
      #------------------------------------------
     
      export PYTHONPATH=/usr/local/lib/python2.6/site-packages:$PYTHONPATH
     
      #------------------------------------------


    More on Python and Homebrew.
  • Big projects like GIMP, Inkscape, Firefox,  and many others...  Are not available as packages, they are already distributed as standalone OSX applications.