Showing posts with label web. Show all posts

Monday, March 20, 2023

Running HTTPS and SSH over the same port with SSLH

Do you need to access your network services from remote locations but are blocked by firewalls or other
access restrictions? You might want to try SSLH, a powerful open-source tool that enables you to run multiple network services over a single port. This allows you to bypass firewalls and access your network services from anywhere. Here will show you how to use SSLH to run both HTTPS and SSH on the same port, but SSLH also supports HTTP and OpenVPN. 

Installing SSLH
SSLH is available in most Linux distributions' package managers, so installation is straightforward. You can install SSLH using the following command:

$ sudo apt-get install sslh

Configuring SSLH
Once SSLH is installed, you need to configure it to run both HTTPS and SSH on the same port. The configuration file for SSLH is usually located at /etc/default/sslh. In the configuration below SSLH listens on all available network interfaces on port 443, and it proxies SSH to port 22 of localhost and HTTPS to port 2443 of localhost. 

DAEMON_OPTS="-u sslh -p 0.0.0.0:443 -s 127.0.0.1:22 -l 127.0.0.1:2443 -P /var/run/sslh.pid"
RUN=yes

Before restarting SSLH, make sure to configure your web server to listen to 2443 instead of 443. Then, restart SSLH with

$ /etc/init.d/sslh start

Testing SSLH
To test SSLH, you can try accessing both the HTTPS and SSH services through the SSLH port. For example, to access HTTPS, open a web browser and navigate to https://<your-server-address>:443. To access SSH, open a terminal and use the ssh command  ssh your-server-address -p 443


Sunday, November 20, 2022

Download files from google drive with python - no API key

There are several scripts to download files from google drive using a shareable link. Some require
authentication others don't work. Here we're interested in those that do not require authentication.

The gdrivedl.py script provided by ndrplz just works fine.

> gdrivedl.py file_id

Another notable, currently non-working, alternative is googledrivedownloader. It probably worked at some point in time but today it fails. There's however a simple fix proposed in this thread. The code is here: 

import requests
 
def download_file_from_google_drive(id, destination):
    URL = "https://docs.google.com/uc?export=download"
 
    session = requests.Session()
 
    response = session.get(URL, params={"id": id, "confirm": 1}, stream=True)
    token = get_confirm_token(response)
 
    if token:
        params = {"id": id, "confirm": token}
        response = session.get(URL, params=params, stream=True)
 
    save_response_content(response, destination)
 
def get_confirm_token(response):
    for key, value in response.cookies.items():
        if key.startswith("download_warning"):
            return value
    return None
 
def save_response_content(response, destination):
    CHUNK_SIZE = 32768
 
    with open(destination, "wb") as f:
        for chunk in response.iter_content(CHUNK_SIZE):
            if chunk:  # filter out keep-alive new chunks
                f.write(chunk)
 
if __name__ == "__main__":
    file_id = "TAKE ID FROM SHAREABLE LINK"
    destination = "DESTINATION FILE ON YOUR DISK"
    download_file_from_google_drive(file_id, destination)

Tuesday, May 25, 2021

Blockchain explained

The clearest explanation of blockchain I've seen, from Anders Brownworth and it comes with an online demo. 


Saturday, February 23, 2019

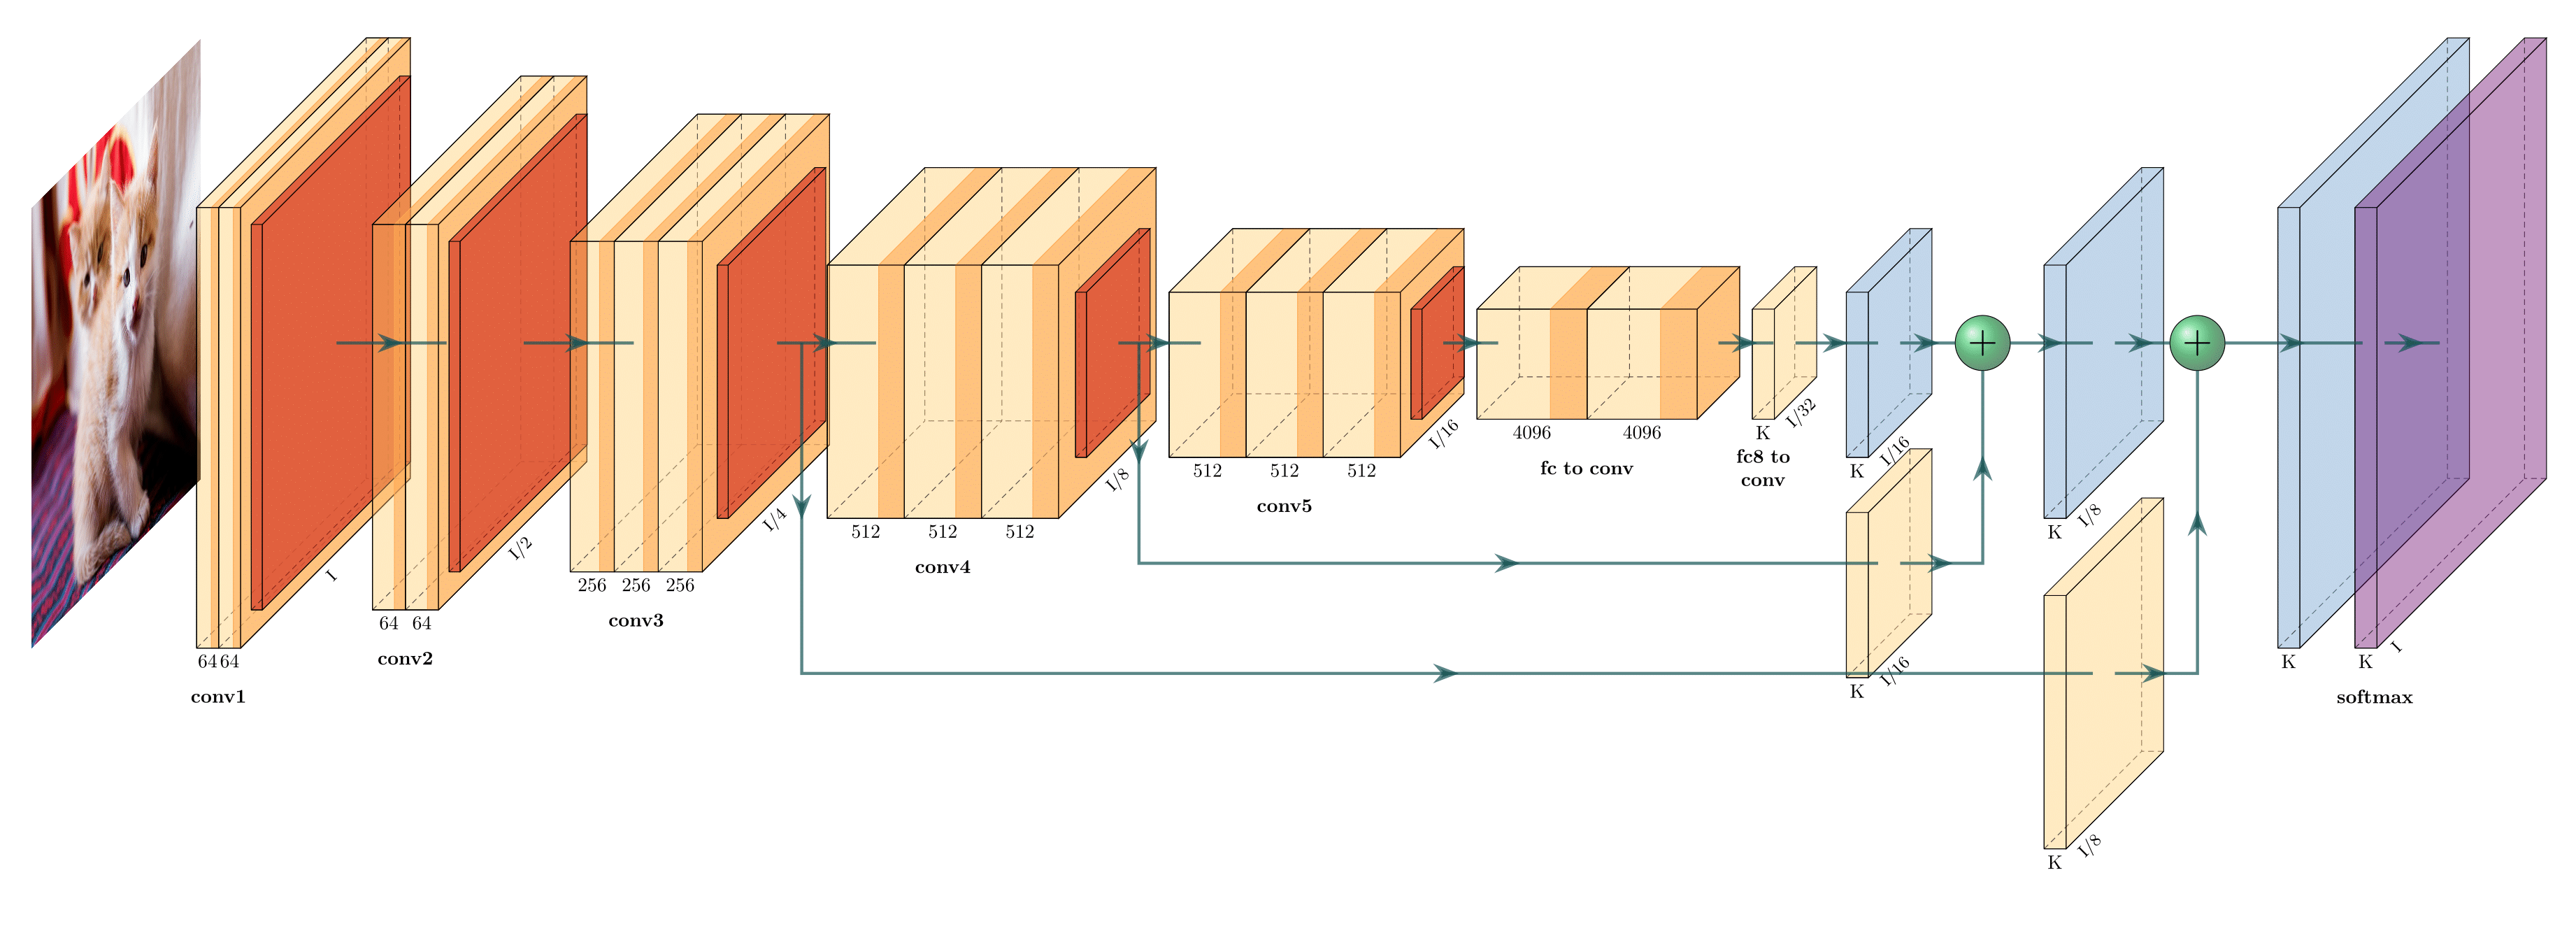
Latex code and other tools for making neural networks diagrams


 PlotNeuralNet generates tikz code (for Latex) for illustrating a network architectures


NN-SVG is an online tool for illustrating simple architectures and that generates SVG code

Tensorspace.js is a web-based tool that takes keras network definitions and produces beautiful 3D representations on the browser that are also functional!

Netscope is a web-based tool for visualizing neural network architectures for the moment only supports Caffe's prototxt format


Have a look at the stackexchange thread about this topic: https://datascience.stackexchange.com/questions/12851/how-do-you-visualize-neural-network-architectures

Sources:
https://github.com/HarisIqbal88/PlotNeuralNet
http://alexlenail.me/NN-SVG/LeNet.html
https://tensorspace.org/html/docs/startHello.html
http://ethereon.github.io/netscope/quickstart.html
https://www.draw.io/ (for manual drawing from elementary shapes)

Saturday, June 15, 2013

OSX: Start SSH socks proxy and change network settings from the command line

Everybody loves to travel. I also enjoy to experience the internet from other places, but this I can do without leaving my house. All I need is a remote unix computer which I can access by SSH.

The script below sets up SSH dynamic port forwarding and changes the network proxy settings all by itself. When communication is cut, with Ctrl-D, it goes back to the usual proxy configuration (no proxy). Tested on OSX 10.6.8.


#!/bin/bash
#title           :socksProxySSH.sh
#description     :initiates SSH dynamic port forwarding and sets up 
#                 the network proxy settings for you
#author          :Gabriele Facciolo (http://linuxtoosx.blogspot.com/)
#date            :20130615
#version         :1.0
#OSX version     :Tested on OSX 10.6.8  
#usage           :socksProxySSH.sh [remoteHost [localPort (default:1080)]]

DEFAULTSSHHOST=""
DEFAULTLOCALSOCKSPORT=1080

# DEAL WITH COMMAND LINE PARAMETERS
if [ "${1}" != "" ]
then
   SSHHOST=$1
else
   SSHHOST=$DEFAULTSSHHOST
fi
if [ "${2}" != "" ]
then
   LOCALSOCKSPORT=$2
else
   LOCALSOCKSPORT=$DEFAULTLOCALSOCKSPORT
fi
# SORRY NO SSHHOST
if [ "${SSHHOST}" == "" ]
then 
   echo "${0}: initiates SSH dynamic port forwarding and "
   echo "sets up the network proxy settings for you."
   echo ""
   echo "    Usage:   ${0} [remoteHost [localPort(default:1080)]]"
   echo ""
   echo "Indicate a remoteHost, or set the DEFAULTSSHHOST variable" 
   exit 1
fi


# ENABLE SOCKS ON ACTIVE INTERFACES 
networksetup -listallnetworkservices | grep -v asterisk | while read line ; do 
t=`networksetup -getinfo "$line" | grep "IP address" | grep -v none`
if [ "$t" ]; then
   tt=`networksetup -getsocksfirewallproxy "$line" | grep -v Authenticated | grep "Enabled: No"` 
   if [ "$tt" ]; then
      echo Enabling SOCKS on $line
      networksetup -setsocksfirewallproxy "$line" localhost $LOCALSOCKSPORT
   fi
fi
done 


# OPEN CONNECTION AND INITIATE SOCKS SERVER
echo ""
echo "INITIATING SSH CONNECTION AND SOCKS SERVER..."
echo "========================================================="
echo "TO DISCONNECT FIRST HIT Ctrl-D, WAIT A SECOND THEN Ctrl-C"
echo "========================================================="
echo ""
ssh -C -D *:$LOCALSOCKSPORT $SSHHOST


# DISABLE SOCKS ON ACTIVE INTERFACES 
networksetup -listallnetworkservices | grep -v asterisk | while read line ; do 
t=`networksetup -getinfo "$line" | grep "IP address" | grep -v none`
if [ "$t" ]; then
   tt=`networksetup -getsocksfirewallproxy "$line" | grep -v Authenticated | grep "Enabled: Yes"` 
   if [ "$tt" ]; then
      echo Disabling SOCKS on $line
      networksetup -setsocksfirewallproxystate "$line" off
   fi
fi
done 


Description of the key commands:
  • networksetup -listallnetworkservices
    Displays a list of all the network services on the server's hardware ports. An asterisk (*) denotes that a network service is disabled.
    Sample output:
             USB Ethernet
             AirPort
             Bluetooth DUN
  • networksetup -getinfo "Airport"
    Displays the IP address, subnet mask, router, and hardware address for the device that you specify.
  • networksetup -getsocksfirewallproxy Airport
    Displays SOCKS proxy (server, port, enabled value) info for the device.
    Sample output:
             Enabled: No
             Server: localhost
             Port: 1080
             Authenticated Proxy Enabled: 0
  • networksetup -setsocksfirewallproxy Airport localhost 1080
    Set and enable the SOCKS proxy server  localhost:1080.
  •  ssh -C -D *:1080 your.remote.host
    Launch ssh with dynamic port forwarding
  • networksetup -setsocksfirewallproxystate Airport off
    Disables SOCKS proxy.

Sources:

Sunday, October 14, 2012

Download/backup BibTeX library from CiteULike, including all the attached PDF

CiteULike is a convenient solution for bibliographic management, but sometimes an off-line replica of the bibliography is also needed. This can be achieved by exporting the CiteULike library in BibTeX format, furthermore BibDesk (and probably other managers too) can be synchronized directly with the CiteULike server.

While it is easy to export a .bib file from CiteULike, downloading all the attached files and having the .bib linking to the downloaded files is a different story.

BibTeX and JSON exports of the CiteULike library can be retrieved from:
  http://www.citeulike.org/json/user/USERNAME
  http://citeulike.org/bibtex/user/USERNAME
The BibTeX export can be read directly into a bibliographic manager, but the JSON export contains more information than the .bib, in particular it contains the location of the attached PDFs. So the idea of the Python script linked below is to do the following
  1. download the CiteULike library in BibTeX and JSON formats
  2. parse the JSON export and download all the attachments
  3. modify the .bib file to include links to the downloaded copies of the attachments
the links in the .bib file should work for BibDesk and JabRef.

Before running the script:
  • setup CITEULIKE_USERNAME and CITEULIKE_PASSWORD variables in the script
  • verify you have wget and pybtex installed
Download the Python script:  citeulike_backup.zip

http://wiki.citeulike.org/index.php/Importing_and_Exporting#JSON


Gory details from http://wiki.citeulike.org/index.php/Importing_and_Exporting#JSON:
# save session cookies
> wget -O /dev/null --keep-session-cookies  --save-cookies cookies.txt --post-data="username=xxxx&password=yyyy&perm=1" http://www.citeulike.org/login.do
# download bibtex with private comments and download an attachment
> wget -O export.bib --load-cookies cookies.txt http://www.citeulike.org/bibtex/user/xxxx
> wget --load-cookies cookies.txt http://www.citeulike.org//pdf/user/xxxx/article/123456/891011/some_99_paper_123456.pdf

Friday, February 24, 2012

A video worth to be seen: Douglas Adams 2001

Parrots the Universe and Everything 
by
Douglas Adams @ University of California,  May 2001
Transcript available at: http://navarroj.com/parrots/.


I've appreciated the subtle link with the 1991 Christmas Lectures: Growing Up in the Universe by Richard Dawkins.

And just to finish about sustainability, a talk of Prof. Albert Bartlett circa 1995.


Friday, November 4, 2011

Hack to prevent Caching of Dynamic Images

Web caches are a necessary component of the web. So, when developing dynamic web contents it is important to be sure if an object is cached or not, otherwise the user may end up seeing some old cached content. The objective here is to block caching of images produced by a service which generates a new image in each call, so the image must be transmitted every time.

The HTML meta tags do not apply to the case of images (and their effectivity is even questionable for HTML pages). The HTTP cache directives are better suited for cache control since most of the web caches honor them. But they entail some customization of the web server in order to send the correct header for each file.

The simplest way to prevent caching of a dynamic image, is to change its url at each run. For that, one possibility is to completely change the filename. But a trick allows to keep the original filenames and still prevent caching, it consists in appending a random querysting to the filename like this:

<img src="output.png?r=1234">

the querystring is discarded by the webserver where output.png is. Still it is seen as a different object by the cache, causing the image to be reloaded every time the page is loaded. 


Source: http://www.itsjustpoison.com/blog/2008/05/12/trick-prevent-image-caching-of-dynamic-images
Source: http://www.i18nguy.com/markup/metatags.html
Reading: http://www.mnot.net/cache_docs/

Saturday, April 23, 2011

The Cicada Principle and tilings

The background of this post uses the "cicada principle" for its tiling.
The two tile elements (shown below) have a prime number of columns, and the resulting pattern is repeated each 15 columns.

Red is transparent


The code for the tiling is:
<div style="background-image: url(bg3.png),url(bg5.png);
     background-size: auto, auto;
     margin: 0;
     padding: 0;
     height: 500px;
     width: 800px;">

<!-- content -->

</div>
Source: http://designfestival.com/the-cicada-principle-and-why-it-matters-to-web-designers/

See also: PNG overly with no extra markup for a non tiled overly as:
<img style="background:url(Background.jpg)" src="Foreground.png"  >

Saturday, January 29, 2011

Show/Hide Content with CSS and JavaScript

Code2HTML is a syntax highlighter which reliefs the painful task of transcribing code to html pages.

Sometimes the code occupies too much of the web page, so it is better to be able to hide it.
It seems that there are many ways of hiding parts of a web page, most rely on CSS and javascript to modify the page.

Here I'm using the script from: http://www.cssnewbie.com/showhide-content-css-javascript/. Below is the code for I'm using in this page.

Some notes:
  • the default state (shown/hidden) depends on which tag that has the: style="display: none;"
  • The tags ID are very important. The elements MUST be named as id="code123" for the hidden content, and the other id="code123-show" for the visible link to the hidden content.
  • The tag ID must be UNIQUE for this element within the current page, otherwise it will affect all the other tags.


Try it! Hide the code

<script type="text/javascript">
<!-- code from http://www.cssnewbie.com/showhide-content-css-javascript/ -->
function showHide(shID) {
 if (document.getElementById(shID)) {
  if (document.getElementById(shID+'-show').style.display != 'none') {
   document.getElementById(shID+'-show').style.display = 'none';
   document.getElementById(shID).style.display = 'block';
  }
  else {
   document.getElementById(shID+'-show').style.display = 'inline';
   document.getElementById(shID).style.display = 'none';
  }
 }
}
</script>


<a class="showLink" href="#" id="code123-show" onclick="showHide('code123');return false;">
See the code.
</a>
<div id="code123" 
style="display: none; border-top: 1px solid #666; border-bottom: 1px solid #666;">
<!-- PUT YOUR CONTENT FROM HERE -->
YOUR CONTENT

YOUR CONTENT

YOUR CONTENT
<!-- TO HERE -->
<p>
<a href="#" id="code123-hide" class="hideLink" onclick="showHide('code123');return false;">
Hide this content.
</a>
</p>
</div>

<!-- syntax highlighted by <a href="http://www.palfrader.org/code2html">Code2HTML</a>, v. 0.9.1 -->

Thursday, December 23, 2010

Data URL scheme, include files in-line in the web page

There is a restriction in the blogger.com sites: you can't upload files.
The data URL scheme provides a way to include data in-line in web pages as if they were external resources.

The format of data URL:

data:[<mediatype>][;base64],<data>

Some examples:
  • Image:  Larry (If you don't see an image your browser does not support data URL)
<IMG
SRC="data:image/gif;base64,R0lGODdhMAAwAPAAAAAAAP///ywAAAAAMAAw
AAAC8IyPqcvt3wCcDkiLc7C0qwyGHhSWpjQu5yqmCYsapyuvUUlvONmOZtfzgFz
ByTB10QgxOR0TqBQejhRNzOfkVJ+5YiUqrXF5Y5lKh/DeuNcP5yLWGsEbtLiOSp
a/TPg7JpJHxyendzWTBfX0cxOnKPjgBzi4diinWGdkF8kjdfnycQZXZeYGejmJl
ZeGl9i2icVqaNVailT6F5iJ90m6mvuTS4OK05M0vDk0Q4XUtwvKOzrcd3iq9uis
F81M1OIcR7lEewwcLp7tuNNkM3uNna3F2JQFo97Vriy/Xl4/f1cf5VWzXyym7PH
hhx4dbgYKAAA7"
ALT="Larry">
<A
HREF="data:image/gif;base64,R0lGODdhMAAwAPAAAAAAAP///ywAAAAAMAAw
AAAC8IyPqcvt3wCcDkiLc7C0qwyGHhSWpjQu5yqmCYsapyuvUUlvONmOZtfzgFz
ByTB10QgxOR0TqBQejhRNzOfkVJ+5YiUqrXF5Y5lKh/DeuNcP5yLWGsEbtLiOSp
a/TPg7JpJHxyendzWTBfX0cxOnKPjgBzi4diinWGdkF8kjdfnycQZXZeYGejmJl
ZeGl9i2icVqaNVailT6F5iJ90m6mvuTS4OK05M0vDk0Q4XUtwvKOzrcd3iq9uis
F81M1OIcR7lEewwcLp7tuNNkM3uNna3F2JQFo97Vriy/Xl4/f1cf5VWzXyym7PH
hhx4dbgYKAAA7">file.dat</A>
  • Link to the same image declared with MIME type: application/octet-stream:  file.dat
  • An example with a zip file (MIME type: application/zip):  data.zip
This site http://www.dopiaza.org/tools/datauri/ provides an easy way to convert a file to the data URL format. Otherwise one may need to uuencode the file.

Some resources:
http://en.wikipedia.org/wiki/Data_URI#cite_note-MSDN-3
http://tools.ietf.org/html/rfc2397
http://htmlcoderhelper.com/how-to-force-save-as-dialog-box-in-firefox-besides-changing-headers/

Wednesday, December 8, 2010

Import electronic certificate into OSX Keychain for Safari & Chrome

By mistake I've used Safari for obtaining a public key certificate from a website that was designed for Firefox or Internet Explorer. At the end of the procedure I've downloaded a file (descargarCert) but the certificate was not installed in the Keychain. I assume that Firefox should recognize the certificate's format and install it automatically, but Safari did not.
After some googling I've discovered that the X.509 certificate formatted as PEM file, and Keychain needed DER.
  • First split the long lines of the original file, with less than 75 chars per line;
  • Then run:
       openssl pkcs7 -inform PEM -in descargarCert -outform DER -out certificate.der -print_certs
  • Lastly import the certificate into the Keychain by opening the output file: certificate.der
Sources:
http://bitacorasigloxxi.wordpress.com/2008/04/28/certificado-digital-fnmt-en-mac-os-x/
http://www.applesfera.com/mac-os/applesfera-responde-certificado-digital-de-la-fnmt-en-mac-os-x

Monday, November 1, 2010

Animations with CSS3.

I didn't know that it was possible animate a web page elements without javascript.
CSS Animations, are currently working only on Webkit browsers (Chrome, Safari).


When it works it can be as exasperating as blinking text.
Example code for a rotating element:

<div 
onmouseout="this.style.webkitTransform='rotate(-360deg)'"
onmouseover="this.style.webkitTransform='rotate(360deg)'" 
style="-webkit-transform: rotate(-360deg); 
-webkit-transition-delay: initial; 
-webkit-transition-duration: 1s; 
-webkit-transition-property: -webkit-transform; 
-webkit-transition-timing-function: ease-in;"
>
...
SOME ELEMENT
...
</div>


References: http://www.andrew-hoyer.com/experiments/walking/,
http://webkit.org/blog/138/css-animation/
and http://www.the-art-of-web.com/css/css-animation/

Tuesday, September 21, 2010

Python and cherrypy on OSX

While running a cherrypy application I got this error:
ImportError: No module named header

The problem and the solution is described here http://old.nabble.com/py2exe-fails-with-%22%22-td18029166.html

>
> .... Creating the exe file works but running it fails with:
>
> Traceback (most recent call last):
>   File "bootstrap.py", line 2, in  
>   File "cherrypy\__init__.pyc", line 164, in  
>   File "cherrypy\_cperror.pyc", line 6, in  
>   File "cherrypy\lib\http.pyc", line 23, in  
>   File "email\__init__.pyc", line 79, in __getattr__
> ImportError: No module named header
>
>
> For that particular import (email.Header) you can upgrade to trunk
> HEAD or apply this small patch: http://www.cherrypy.org/changeset/1967.
> That email module is only used for decoding RFC-2047 text, which hardly any clients ever do.
>
                                                                  
The solution is to modify the file: /sw/lib/python2.6/cherrypy/lib/http.py (this is the path particular of my machine)


Index: trunk/cherrypy/lib/http.py
===================================================================
--- trunk/cherrypy/lib/http.py (revision 1836)
+++ trunk/cherrypy/lib/http.py (revision 1967)
@@ -21,5 +21,4 @@
 
 import cgi
-from email.Header import Header, decode_header
 import re
 from rfc822 import formatdate as HTTPDate
@@ -197,4 +196,5 @@
 def decode_TEXT(value):
     """Decode RFC-2047 TEXT (e.g. "=?utf-8?q?f=C3=BCr?=" -> u"f\xfcr")."""
+    from email.Header import decode_header
     atoms = decode_header(value)
     decodedvalue = ""
@@ -366,4 +366,5 @@
                         # Encode RFC-2047 TEXT
                         # (e.g. u"\u8200" -> "=?utf-8?b?6IiA?=").
+                        from email.Header import Header
                         v = Header(v, 'utf-8').encode()
                     else:


The patch is also available at: http://www.cherrypy.org/changeset/1967

Friday, June 4, 2010